
1. EDU-Learing Kit-V2 EDU-V2-E01
-- Module /sensor GPIO Learning Kits
( support Raspberry Pi B2/A+/B+)
Windows10 IoT i2c Temperature & Humidity APP Demo
Windows10 IoT i2c RGB-W LED & PWM Servo APP Demo
Windows10 IoT i2c 23017 32 GPIO output APP Demo
Windows10 IoT Traffic Light APP Demo
Windows10 IoT i2c detect APP Demo
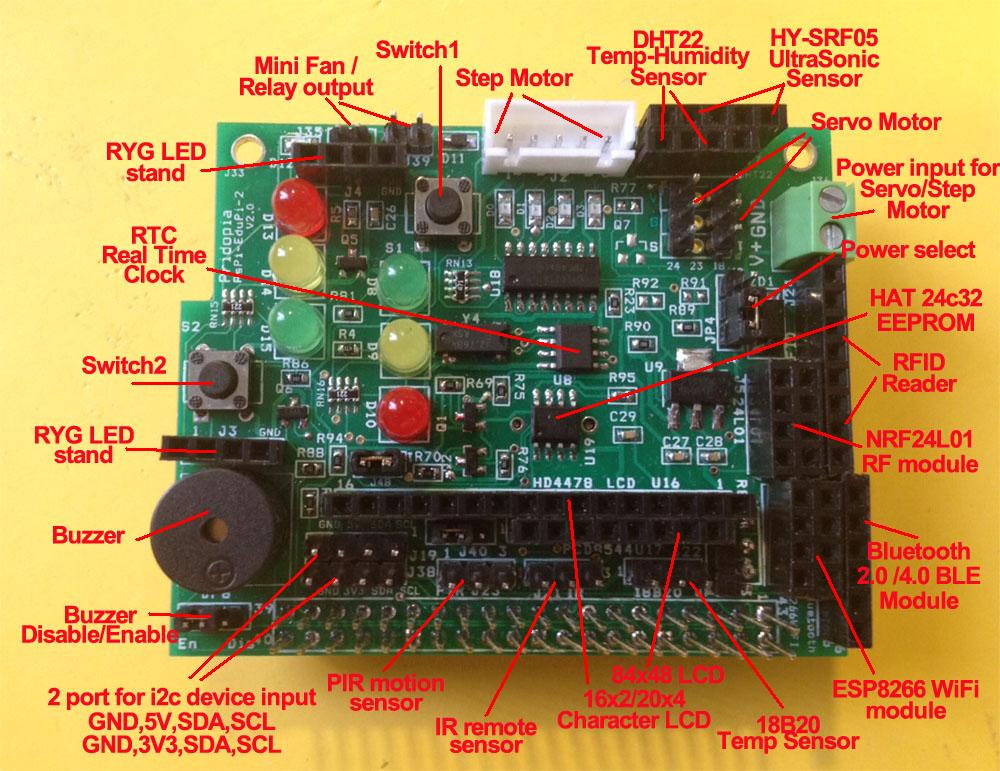
1.The EDU Learning Board provide RTC clock with CR1220 3V Backup Battery.
2. provide 2 switch control 2 sets Traffic light , provide python traffic light program.
3. provide RFID Reader socket ( SPI signal) / NRF24L01 socket (SPI signal)
you can choose use RFID or NRF24L01 ( both use SPI signal)
4. Provide 2 extra i2c device input port, one for 3.3V, one for 5V
5. provide 3.3V power Regulator for 3.3V device ( RFID/ NRF24L01/ESP8266) i2c device
6. provide DS18B20 temperature sensor socket (GPIO4)
7. provide IR Receiver sensor socket (GPIO23)
8. provide IR PIR motion sensor socket (GPIO23)
9 provide 1 5V 28BYJ-48 Step Motor socket (5V can select from Pi or external)
(GPIO 17,18,27,22) Step Motor
10 provide 1 buzzer (GPIO24)
11 provide 2 sets traffic light
first set traffic light Red (GPIO19), Yellow(GPIO13), Green (GPIO12) ,Switch 1(GPIO20)
second set traffic light Red (GPIO16), Yellow(GPIO21), Green (GPIO26) ,Switch 2(GPIO6)
Below are the new functions we added in V2
Advance user -------- in AT command mode
need a Windows 10 computer to unzip and make image for your SD card
Download the package “Windows 10 IoT Core Insider Preview Image for Raspberry Pi 2†from Microsoft Connect.
Windows_IoT_Core_RPI2_BUILD.zip

Open an admininistrator command prompt and navigate to the folder containing your local Flash.ffu.

Using the administrator command prompt, apply the image to your SD card. Run the following command:
dism.exe /Apply-Image /ImageFile:Flash.ffu /ApplyDrive:\\.\PhysicalDriveN /SkipPlatformCheck
/ApplyDrive:\\.\PhysicalDrive1


Install WindowsDeveloperProgramForIoT.msi. It can be found inside any of the Windows 10 IoT Core Insider Preview image files (for example, Windows 10 IoT Core Insider Preview image for Raspberry Pi 2.zip)

Notice that the Windows IoT Core Watcher application automatically starts when you log on. It can be used to find available Windows 10 IoT Core devices to deploy apps to.
Install Windows 10 to PC
Install Visual Studio 2015 Preview . Choose the Custom option when you kick off the installer,

and then select Universal Windows App Development Tools. On the next page confirm that
Tools and Windows SDK, and Emulators for Windows Mobile options are going to be installed.


Connecting to your Windows 10 IoT Core device from your development PC:
Connecting your Windows 10 IoT Core device directly to your PC & setting up Internet Connection Sharing (ICS)
If you don't have a local network to plug your device into, you can create a direct connection to your PC. In order to connect and share the internet connection in your PC with your IoT Core device, you must have the following:
Follow the instructions below to enable Internet Connection Sharing (ICS) on your PC
After you have enabled ICS on your PC, you can now connect your Windows 10 IoT Core device directly to your PC. You can do it by plugging in one end of the spare Ethernet cable to the extra Ethernet port on your PC, and the other end of the cable to the Ethernet port on your IoT Core device.


use browser access Pi-2


* Microsoft reserved GPIO 19,20,21,17 as SPI1 signal, so we can't use
these pin as normal GPIO input/output function right now, so we
change GPIO19 to GPIO25, GPIO20 to GPIO23, GPIO21 to GPIO27 for
this demo


Buzzer (GPIO24)
first set traffic light Red (GPIO19) --> GPIO25 , Yellow(GPIO13), Green (GPIO12) , Switch 1(GPIO20) -->GPIO23
second set traffic light Red (GPIO16), Yellow(GPIO21) -->GPIO27, Green (GPIO26) , Switch 2(GPIO6)
I2C 23017 32 GPIO output APP

Traffic Light APP example in Win10

I2C DETECT APP example in Win10

Demo program
1.Win10 IoT Visual Studio I2C 23017 32 GPIO output APP
2.Win10 IoT Visual Studio Traffic Light APP
3.Win10 IoT Visual Studio I2C detect APP


0 Comment